Affordable Enterprise-Grade ESI Caching with QUIC.cloud

You’re aiming for enterprise-grade performance for your WordPress setup without breaking the bank, and QUIC.cloud offers a compelling solution. With QUIC.cloud, OpenLiteSpeed users gain access to Edge Side Includes (ESI) caching, a feature that enables truly personalized and lightning-fast pages for logged-in users. This includes dynamic elements like WooCommerce carts, LMS progress indicators, and membership-site content that traditional caching systems either overlook or slow down. ESI works by serving the majority of your page from cache instantly while assembling personalized parts dynamically on the server, eliminating layout shifts and AJAX delays. OpenLiteSpeed, a popular open-source web server, doesn’t natively support ESI, forcing users to either pay for the pricey LiteSpeed Enterprise license or forgo ESI entirely. QUIC.cloud smartly fills this gap by providing ESI at the CDN edge, delivering enterprise-level caching without exorbitant costs or complex setups.

💡

Did You Know?

QUIC.cloud provides enterprise-grade ESI caching for OpenLiteSpeed users starting at $0 with its Free Plan, making personalized, fast WordPress pages accessible without expensive licensing.

Source: LiteSpeed Technologies

Understanding Edge Side Includes (ESI) Caching

You’re aiming for enterprise-grade performance for your WordPress setup without breaking the bank, and this piece centers on how QUIC.cloud enables OpenLiteSpeed users to get Edge Side Includes (ESI) caching that previously seemed out of reach. You’re guided through the practical problem, the available options, and why QUIC.cloud stands out as a cost-effective path to truly personalized, fast pages for logged-in users, such as WooCommerce carts, LMS progress data, and membership-site content.

Edge Side Includes (ESI) is a powerful caching technology that bridges the gap between fully static pages and highly dynamic content on your website. Imagine a product page on your site that’s 95% the same for every visitor: the product description, images, and reviews remain constant. However, the 5% difference might include personalized elements like the logged-in user’s cart icon, their name in a welcome message, or membership-specific navigation menus.

Traditional caching solutions typically take one of two approaches: they either cache the entire page statically, which eliminates any chance of personalization, or they bypass caching for logged-in or customized views, slowing down the site by requiring a dynamic page load for every visitor. This leads to slower performance, higher server load, and often a jarring user experience with layout shifts or delayed content loading by JavaScript.

ESI solves this elegantly by enabling you to “punch holes” in the cached page. This means the main body of the page—the static 95%—is served immediately from cache, while the dynamic 5%—your user-specific cart widget, greetings, or membership info—is fetched and inserted dynamically at the server or CDN level before the page is delivered. The key advantage is that the page arrives fully composed, without client-side jank or layout shifts, making for a seamless, fast, and personalized experience.

This makes ESI particularly valuable for sites with logged-in users or membership requirements. Think WooCommerce stores where the cart must update instantly for each user without caching the whole page dynamically, or Learning Management Systems (LMS) that show identical course content but individualized progress bars. Membership sites with role-specific navigation benefit as well, enabling caching efficiency without sacrificing personalization.

To illustrate, consider a product page. The bulk of the content—product title, price, description, and images—remains consistent for everyone. But each user’s mini-cart, shown in the header, must update in real-time to reflect their shopping behavior. ESI allows the page to cache the static content while delegating that cart section to be loaded uniquely for every visitor, at the server or CDN edge.

Example: Static vs. Dynamic Content with ESI

Here’s a simplified example of how ESI tags might be used in a product page’s HTML:

The snippet above demonstrates that the majority of the product page HTML can be cached and served instantly, while the <esi:include src="/dynamic/cart-info" /> tag instructs the server to fetch dynamic cart information personalized for the logged-in user.

You avoid the common pitfalls of client-side dynamic loading—no need for AJAX calls after page load, no delayed rendering, and no layout instability—because the entire page HTML is composed on the backend or at the CDN edge.

Without ESI, site owners have traditionally faced difficult trade-offs. Static caching benefits everyone but at the cost of personalization, and bypassing cache for logged-in users leads to slow, resource-heavy pages. ESI delivers the best of both worlds: serving cached content quickly while maintaining personalized dynamic components.

OpenLiteSpeed’s ESI Limitations

OpenLiteSpeed is an open-source, lightweight web server that excels in basic caching and speed but lacks native support for Edge Side Includes (ESI). This limitation means it cannot natively “punch holes” in cached pages to dynamically serve personalized, user-specific fragments like carts or membership content. Without ESI, OpenLiteSpeed either serves fully cached pages the same way to every visitor or bypasses caching for dynamic elements, sacrificing performance and user experience.

ESI requires server-side processing to assemble static and personalized parts of a page on the fly. OpenLiteSpeed users who want full ESI support typically face a choice: upgrade to the commercial LiteSpeed Web Server Enterprise or accept the inherent restrictions.

LiteSpeed Web Server Enterprise provides native ESI capabilities out of the box, allowing dynamic content to be cached effectively and served rapidly. However, this enterprise-grade solution carries licensing fees starting at $10 per month per server for a standard site owner license and scaling significantly for web host licenses. For example, a Web Host Professional license costs $46 per month, scaling up to $65 for enterprise-level usage. These costs multiply quickly in multi-server environments, making it a significant expense for small to medium businesses.

The cost factor has made the enterprise version less accessible for many users despite its performance benefits. OpenLiteSpeed remains free but limited to simpler caching scenarios without dynamic personalization, which is less ideal for modern eCommerce, membership, or LMS sites needing tailored content.

Below is a comparison table highlighting the differences in ESI support and licensing between OpenLiteSpeed, LiteSpeed Web Server Enterprise, and QUIC.cloud CDN — an alternative that provides ESI at the edge, reducing server costs by handling ESI on a pay-as-you-go CDN model instead of per-server licensing.

To illustrate the impact of lacking native ESI support, consider how OpenLiteSpeed handles caching and dynamic content requests separately. The below JavaScript snippet exemplifies a simplified server handling static cached pages without ESI versus dynamic widget data that would require ESI in an advanced setup.

This example shows how OpenLiteSpeed serves a cached static page but must separately fetch and render dynamic elements like cart data without native ESI. This approach increases complexity, client-side delays, or forces complete cache bypass for dynamic parts, affecting overall site speed and user experience.

In summary, while OpenLiteSpeed offers free, efficient caching for static content, its lack of native ESI means users either pay substantial licensing fees to gain full enterprise-grade ESI capabilities with LiteSpeed Enterprise or look for innovative alternatives like QUIC.cloud that deliver ESI functionality without those heavy costs.

Why QUIC.cloud is the Best Option

For enterprises seeking to optimize WordPress performance with advanced caching techniques, QUIC.cloud offers a game-changing solution. It delivers Edge Side Includes (ESI) caching at the CDN level, enabling personalized web experiences without the hefty costs traditionally associated with native server-level ESI support. This feature is especially valuable for sites with dynamic user-specific content like WooCommerce carts, membership site sections, or personalized greetings.

OpenLiteSpeed powers many WordPress sites due to its lightweight, open-source nature. However, it lacks built-in support for ESI—a critical shortcoming for delivering personalized yet fast page loads. Until recently, the common approach to gain ESI involved purchasing LiteSpeed Enterprise licenses, which include native server-side ESI processing. While effective, this path incurs significant expenses, particularly for setups running multiple VPS servers.

To illustrate, LiteSpeed Enterprise pricing ranges from $120 to $780 annually per server. The entry-level Site Owner plan costs $120/year for a single domain with 8GB RAM support. For web hosts managing multiple domains, the costs escalate substantially. The Web Host Lite license charges $312 per year, the Web Host Professional $552, and the top-tier Web Host Enterprise $780 annually, creating a heavyweight financial burden for many businesses.

QUIC.cloud’s innovative approach sidesteps this by providing ESI support at the CDN level rather than the server. This means your OpenLiteSpeed server can remain cost-effective without ESI capability while QUIC.cloud’s global CDN handles dynamic fragment assembly at the edge. The result is a high-speed, personalized page load experience with minimal server overhead. You can see an example of configuring QUIC.cloud ESI support within OpenLiteSpeed below:

With QUIC.cloud, you activate ESI by toggling caching and ESI directives in your virtual host configuration, enabling the CDN to intercept and dynamically reassemble page fragments. This eliminates layout jank, avoids AJAX delays, and prevents expensive full page regeneration on origin servers.

Beyond technical benefits, the primary allure of QUIC.cloud lies in its cost-effectiveness. The CDN pricing model is pay-as-you-go with base and premium tiers that typically cost between $48 and $96 annually, substantially lower than any LiteSpeed Enterprise license. This enables enterprises and smaller businesses alike to access enterprise-grade ESI caching without the overhead of expensive server licenses or complex infrastructure.

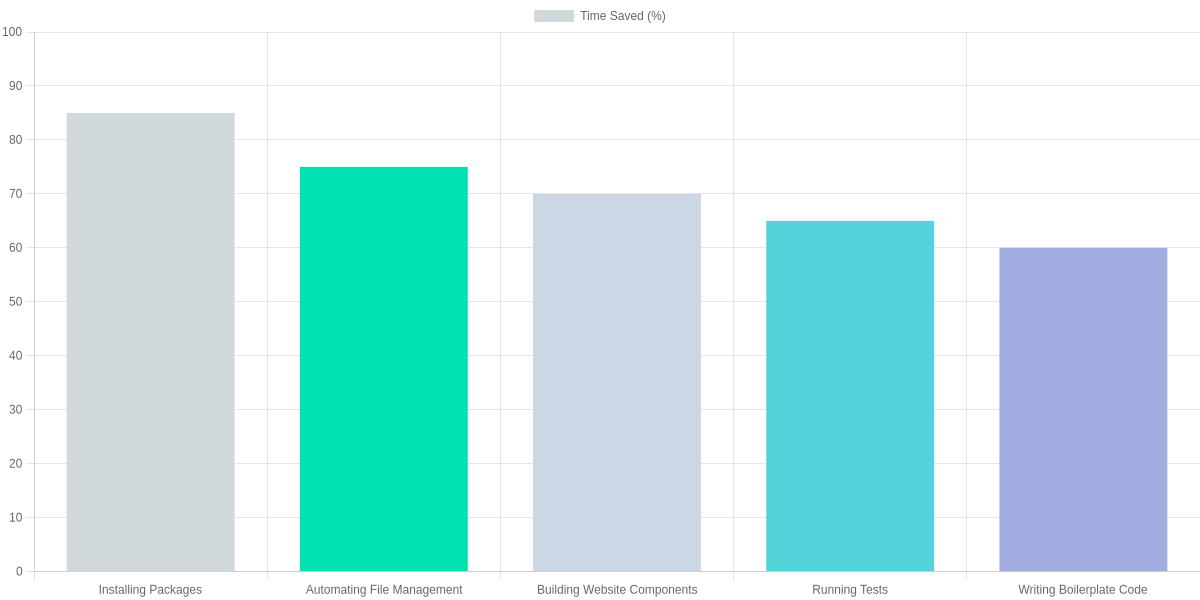
The chart above clearly demonstrates the stark price contrast. Where even the most basic LiteSpeed Enterprise license requires $120 yearly, QUIC.cloud’s entry-level pricing is less than half that, and premium plans still come in far below the middle-tier LiteSpeed licenses. This affordability is amplified when scaling across multiple servers or domains, making QUIC.cloud the practical choice for budget-conscious companies that refuse to compromise performance.

Functionally, QUIC.cloud also delivers an integrated CDN, speeding up static assets and cached content globally. LiteSpeed Enterprise licenses typically require you to source a separate CDN provider, adding more cost and complexity. OpenLiteSpeed, while free, lacks any ESI support, making it a less appealing option for dynamic content-heavy sites.

This comparison table highlights the major differentiators:

  • ESI Support: LiteSpeed Enterprise offers native server-level ESI, OpenLiteSpeed has none, while QUIC.cloud provides robust ESI at the CDN level.
  • Pricing: LiteSpeed Enterprise pricing scales steeply per server; QUIC.cloud’s CDN fees remain modest and usage-based.
  • CDN Integration: QUIC.cloud includes a seamless CDN edge, whereas LiteSpeed Enterprise requires additional CDN services, and OpenLiteSpeed has no CDN.
  • Server Load: QUIC.cloud moves the ESI processing away from origin servers to the edge, preserving server resources, unlike LiteSpeed Enterprise which adds load to servers.
  • Ideal Use Cases: LiteSpeed Enterprise fits large enterprises needing full server control; OpenLiteSpeed suits basic or low dynamic sites; QUIC.cloud targets fast, personalized sites at affordable rates.

In summary, QUIC.cloud represents the best option for businesses aiming to unlock affordable, enterprise-grade ESI caching with their OpenLiteSpeed setups. It combines technical efficiency, global CDN acceleration, and a pricing model that scales gently—empowering WordPress and WooCommerce sites to deliver personalized experiences dynamically at scale.

Real-World Applications of ESI

Edge Side Includes (ESI) caching through QUIC.cloud brings tangible benefits across versatile WordPress use cases, delivering fast, personalized user experiences without the heavy costs traditionally associated with enterprise-grade solutions. Below, we explore how QUIC.cloud’s ESI caching revolutionizes WooCommerce stores, Learning Management Systems (LMS), and membership sites, highlighting practical impacts and scalability.

WooCommerce: Dynamic Cart and Seamless Shopping

For WooCommerce, personalized shopping carts and customer-specific content like recently viewed products or user greetings are critical for conversions. Without ESI, caching dynamic cart content while serving static product pages fast is a challenge—often forcing stores to trade speed for personalization.

With QUIC.cloud’s CDN-level ESI caching, WooCommerce stores can cache the majority of product and category pages globally while dynamically injecting real-time cart fragments directly at the edge. This reduces server load dramatically and minimizes latency, even for logged-in users with constantly changing carts. Customer interactions become faster and more reliable, improving user experience without sacrificing personalization.

Developers can integrate ESI dynamically with simple JavaScript calls that fetch the updated cart widget directly from QUIC.cloud, ensuring that cart updates feel instant and fluid.

LMS Platforms: Real-Time User Progress and Content Delivery

Learning Management Systems require frequent, user-specific progress updates like quiz results, course completions, and personalized dashboards—elements that typically bypass cache and slow down the platform.

QUIC.cloud’s real-time ESI support enables LMS sites running on OpenLiteSpeed to cache most static course content while dynamically inserting real-time progress data and user-specific recommendations at the edge. This architecture reduces server response times, improves scalability during enrollment surges, and preserves the integrity of personalized learning paths.

Educators and platform admins benefit from smoother experiences for thousands of simultaneous learners without dedicating significant resources to costly server licenses or complex caching strategies.

Membership Sites: Personalized Access with Edge Efficiency

Membership and subscription sites often feature a mix of public and private content that changes based on user permissions and membership tiers. Traditional caching either caches everything and restricts personalization or disables caching for logged-in users, negatively impacting performance.

Using QUIC.cloud ESI caching, membership sites can efficiently cache shared page elements while dynamically serving personalized menus, user-specific offers, and member-only content at the edge. This helps maintain fast load times for members accessing gated content and reduces the server load caused by frequent cache bypasses.

By delivering personalized content fragments from the CDN, membership sites achieve both responsiveness and customization excellence, driving member engagement and retention.

Adoption trends clearly show rapid growth in ESI caching usage across these sectors, with increasing recognition of how cost-effective edge caching with QUIC.cloud boosts dynamic site performance.

Setting Up QUIC.cloud ESI on OpenLiteSpeed

Setting up QUIC.cloud Edge Side Includes (ESI) caching on an OpenLiteSpeed server opens up powerful capabilities for serving dynamic, personalized content efficiently. Although OpenLiteSpeed doesn’t support ESI natively, leveraging QUIC.cloud’s CDN-level ESI gives you enterprise-grade dynamic caching without costly licensing. Here is a detailed step-by-step guide for integrating QUIC.cloud ESI with OpenLiteSpeed.

Step 1: Install OpenLiteSpeed and PHP

Start with a fresh server or existing OpenLiteSpeed setup. First, update your package repositories and install OpenLiteSpeed along with a compatible PHP version, such as PHP 7.4:

  • sudo apt update
  • sudo apt install openlitespeed lsphp74 lsphp74-common lsphp74-mysql

Step 2: Enable the QUIC.cloud Plugin in WordPress

Log in to your WordPress admin dashboard to install and activate the LiteSpeed Cache plugin. This plugin is essential for integrating your site with QUIC.cloud’s caching ecosystem.

  • Navigate to Plugins > Add New.
  • Search for LiteSpeed Cache and install it.
  • Activate the plugin, then go to LiteSpeed Cache > CDN.
  • Enter your QUIC.cloud API key and secret to connect your site with QUIC.cloud.

This connection enables your site to communicate with QUIC.cloud, orchestrating ESI caching and dynamic content assembly at the edge.

Step 3: Configure OpenLiteSpeed to Support QUIC.cloud ESI

OpenLiteSpeed requires manual configuration changes to support QUIC.cloud’s ESI instructions. Edit the main OpenLiteSpeed configuration file to enable caching and ESI directives:


sudo nano /usr/local/lsws/conf/httpd_config.conf

Inside your <VirtualHost> section, add:


<IfModule LiteSpeed>
  CacheLookup on
  CacheStore on
  CacheEngine on
  EnableESI on
</IfModule>

These directives activate OpenLiteSpeed’s cache engine and enable ESI processing for requests going through QUIC.cloud.

Step 4: Restart OpenLiteSpeed

Apply your configuration changes by restarting the OpenLiteSpeed service:


sudo /usr/local/lsws/bin/lswsctrl restart

Step 5: Verify Your ESI Setup

Confirm ESI is working by checking your site’s HTTP response headers for the “X-ESI: 1” flag, which signals active ESI processing:


curl -I https://yourdomain.com/sample-page

Look for the X-ESI: 1 header in the response. If you see it, your QUIC.cloud ESI setup is successfully integrated with OpenLiteSpeed.

Troubleshooting Common Issues

  • API Key Issues: Ensure your QUIC.cloud API credentials are correct and properly entered in the LiteSpeed Cache plugin.
  • Plugin Compatibility: Use the latest LiteSpeed Cache plugin version to avoid compatibility problems with the CDN.
  • OpenLiteSpeed Version: Verify your server has the required OpenLiteSpeed modules enabled and is up to date.
  • Conflicting Cache Rules: Check for conflicting caching rules in .htaccess or server config files that might override QUIC.cloud’s ESI setup.

With these steps, your WordPress site on OpenLiteSpeed will efficiently serve personalized, dynamic content by offloading cache assembly to QUIC.cloud’s ESI-enabled CDN — delivering a seamless and fast experience for both logged-in users and guests, without the high costs associated with LiteSpeed Enterprise licensing.

Setup Script Overview

Here’s a practical bash script and configuration snippet summarizing the setup steps — including installing required software, plugin activation instructions, OpenLiteSpeed configuration, and verification commands:


Frequently Asked Questions

Edge Side Includes (ESI) is a smart caching mechanism that allows websites to separate dynamic content—like personalized cart icons or user greetings—from static page elements. This means your site can deliver most of the page instantly from cache while filling in personalized details on the fly. It eliminates slowdowns from fully dynamic or uncacheable pages and avoids annoying layout shifts.

QUIC.cloud stands out from other CDNs by offering enterprise-grade ESI caching at a cost far lower than LiteSpeed Enterprise licenses. It integrates directly with OpenLiteSpeed servers to deliver personalized content fast, reducing the burden on your origin server and speeding up page loads for logged-in users. This makes it especially valuable for WooCommerce stores, membership sites, and LMS platforms.

QUIC.cloud is designed primarily for OpenLiteSpeed and LiteSpeed Enterprise environments, making the most of their unique ESI capabilities. While you can connect QUIC.cloud to other types of servers, the full benefits of ESI caching might not be available or may require extra setup, so it’s best suited to sites running LiteSpeed technologies.

What is Edge Side Includes (ESI) and why is it important?

ESI is a caching technology that allows dynamic parts of a web page, like personalized cart icons or greetings, to be updated separately from static content. This speeds up loading times while maintaining personalized user experiences without layout shifts or delays.
How does QUIC.cloud compare to other CDN providers?

QUIC.cloud offers enterprise-grade ESI caching at a fraction of the cost of LiteSpeed Enterprise licenses. Unlike other CDNs, it integrates seamlessly with OpenLiteSpeed, enabling dynamic personalized content delivery directly at the CDN level, reducing server load and improving speed.
Can I use QUIC.cloud with servers other than OpenLiteSpeed?

QUIC.cloud primarily supports OpenLiteSpeed and LiteSpeed Enterprise servers. While OpenLiteSpeed users benefit from CDN-level ESI caching with QUIC.cloud, using it with non-LiteSpeed servers may not provide full ESI functionality or require additional configuration.

Conclusion

You’re aiming for enterprise-grade performance for your WordPress setup without breaking the bank, and this piece centers on how QUIC.cloud enables OpenLiteSpeed users to get Edge Side Includes (ESI) caching that previously seemed out of reach. You’re guided through the practical problem, the available options, and why QUIC.cloud stands out as a cost-effective path to truly personalized, fast pages for logged-in users, such as WooCommerce carts, LMS progress data, and membership-site content.

ESI is key to delivering a seamless user experience by caching the static 95% of pages while dynamically assembling the personalized 5%. OpenLiteSpeed’s lack of native ESI support once limited choices to expensive LiteSpeed Enterprise licenses or no ESI at all. QUIC.cloud changes the game by providing ESI at the CDN edge, allowing sites on OpenLiteSpeed, NGINX, or Apache to enjoy enterprise-grade caching without pricey server licenses.

QUIC.cloud’s Free Plan offers six floating PoPs and ESI support, making it a risk-free starting point. The Standard Plan scales affordably, with generous bandwidth credits and global coverage. Setup is simple with the LiteSpeed Cache plugin—no coding required. This approach not only boosts performance for personalized content but also cuts costs for WooCommerce stores, LMS platforms, and membership sites.

Give QUIC.cloud a try on the Free Plan today and experience how it can transform your WordPress caching and user experience while keeping costs minimal.

🎯 Key Takeaways

  • QUIC.cloud delivers enterprise-grade ESI caching for OpenLiteSpeed users without costly licenses.
  • ESI enables fast, personalized content for logged-in users—crucial for WooCommerce, LMS, and membership sites.
  • Traditional origins lack native ESI; QUIC.cloud runs ESI at the CDN edge, reducing origin server cost.
  • Pricing is accessible: Free Plan offers essential features and 6 PoPs; Standard Plan scales affordably.
  • Setup is straightforward via LiteSpeed Cache plugin integration, no custom coding required.
  • Real-world savings and performance gains outperform pricey LiteSpeed Enterprise licensing.
  • Start risk-free on QUIC.cloud Free Plan and evaluate improved site speed and UX.

TL;DR: QUIC.cloud offers an affordable solution for OpenLiteSpeed users by providing Edge Side Includes (ESI) caching, allowing for personalized and fast WordPress pages without the high costs of a LiteSpeed Enterprise license. ESI facilitates the quick serving of static content while dynamically loading user-specific elements, improving site performance and the user experience. With a free plan available, QUIC.cloud makes enterprise-grade caching accessible to all.

WordPress: The Most Popular CMS for Content Management

WordPress stands as the most popular content management system (CMS) in the world, powering over 43% of all websites on the internet. Whether you’re a solo blogger or part of a larger organization, WordPress provides a reliable, user-friendly platform to create, manage, and share your content with ease. Its extensive customization options through thousands of themes and plugins enable you to tailor your site to your unique needs without requiring advanced technical skills.

This guide introduces you to WordPress by focusing on the essential topics you need to master for effective site management. You’ll learn how to access your site securely and navigate the WordPress Dashboard, a centralized hub for managing your online presence. Managing posts, pages, and media will become straightforward, while setting up your user profile and integrating Gravatar will help personalize your site’s identity. Additionally, you’ll discover valuable learning resources and community support that can enhance your WordPress experience.

💡

Did You Know?

WordPress powers over 43% of all websites on the internet, making it the dominant CMS globally.

Source: W3Techs, 2024

Accessing Your WordPress Site

WordPress stands as the most popular content management system (CMS) in the world, and you can rely on it to create, manage, and share content whether you’re a solo blogger or part of a larger organization. This guide introduces you to WordPress by highlighting its user-friendly interface, its extensive customization options through themes and plugins, and the strong support you can find in its robust community. It outlines essential topics you’ll want to master to manage your site effectively: accessing your site, navigating the dashboard, managing posts and pages, setting up your user profile, and locating useful learning resources. Each section is designed to help you understand WordPress better and improve your experience with this powerful CMS.

Accessing your WordPress site is your crucial first step toward effective website management. The conventional login process involves navigating to your site’s URL followed by /wp-admin (for example, www.yoursite.com/wp-admin). This opens the login interface where you provide your username and password linked to your WordPress account. Successful authentication grants you access to the WordPress Dashboard, the central hub for running your site.

Security is a paramount concern when managing a website. WordPress supports enhanced login security measures like two-factor authentication (2FA). You can enable 2FA through popular security plugins such as Wordfence or Two Factor Authentication. This adds an additional verification step beyond your password, reducing the risk of unauthorized access. It’s a recommended practice for all users, especially those handling sensitive or high-traffic sites.

In the event you forget your login credentials, WordPress provides a straightforward recovery process. On the login page, clicking the Lost Your Password? link initiates a password reset workflow. You simply enter your username or registered email address, and WordPress sends you a secure reset link via email. Following this link lets you set a new password and regain access promptly without admin intervention.

When your tasks are complete, it’s important to log out securely to prevent unauthorized use, particularly on shared or public devices. The logout option is found in the top-right corner of the Dashboard interface, ensuring you can end your session quickly and safely.

Managing your WordPress login programmatically can also be useful in certain scenarios such as automation or development testing. For example, you can programmatically access the login page URL using a simple script, ensuring your site is reachable and the login page loads as expected.


wordpress-login.js

JavaScript

// Example: Programmatically access WordPress login page
fetch('https://www.yoursite.com/wp-login.php')
.then(response => response.text())
.then(html => console.log('Login page loaded'))
.catch(error => console.error('Error loading login page:', error));
Fetching WordPress Login Page Programmatically

Navigating the WordPress Dashboard

The WordPress Dashboard is your command center for managing your website. Upon logging in at yoursite.com/wp-admin, you arrive at this central hub, where you can access all the tools and settings needed to customize and control your site. The dashboard offers a flexible layout tailored to your needs, making site management efficient and intuitive.

Customizing your dashboard is key to streamlining your workflow. WordPress allows you to personalize the layout by adding, removing, or rearranging widgets that display relevant information such as recent posts, site stats, and news from the WordPress community. This customization capability ensures your dashboard displays the metrics and shortcuts most useful to you.

Key Menu Items

The left-hand sidebar menu is your primary navigation tool within the dashboard. Its key sections include:

  • Posts: Manage blog posts, categories, and tags here. This is where you write, edit, and publish your content.
  • Pages: Similar to posts, but for static content like your About or Contact pages. Pages do not use categories or tags.
  • Media: A library for all your images, videos, and files. You can upload new media or manage existing files.
  • Comments: Review, approve, delete, or respond to visitor comments left on your posts and pages.
  • Appearance: Customize your site’s look by selecting themes, managing widgets, and editing menus.
  • Plugins: Extend your site’s functionality by adding or managing plugins that add new features.
  • Users: Manage site users, their roles, and permissions. This is essential for multi-author blogs or organizational websites.
  • Settings: Control core configurations like site title, time zone, permalink structure, and more.

Other items may appear based on plugins and themes active on your site, providing additional options and tools tailored to your specific needs.

Using Screen Options

A powerful feature at the top right of the dashboard is the Screen Options tab. This tab allows you to customize what sections and widgets you want to see on your current dashboard view. For example, if the default dashboard feels cluttered, you can uncheck irrelevant panels to focus only on the essentials. Conversely, if you need additional information or management areas displayed, you can enable those with a simple click.

Screen Options also applies to other admin pages. For instance, when managing posts or plugins, you can adjust how many items appear per page or toggle visibility of specific columns and filters. This feature enables a cleaner and more productive administration experience by adapting the interface to your preferences.

By combining these dashboard tools and customization options, WordPress empowers users of all skill levels to efficiently manage website content and settings without overwhelming complexity.

Posts: Loading…
Comments: Loading…

Sample Code for Dashboard Stats Retrieval

The WordPress REST API can be used to programmatically access dashboard data, allowing developers to integrate and manipulate site information dynamically. Below is an example of how you might fetch and display post and comment counts using JavaScript:


dashboard-stats.js

JavaScript

// Example code for retrieving WordPress dashboard stats using the REST API
async function fetchDashboardStats() {
const response = await fetch('/wp-json/wp/v2/stats');
if (!response.ok) {
throw new Error('Failed to fetch dashboard stats');
}
const stats = await response.json();
console.log('Dashboard Stats:', stats);
return stats;
}
fetchDashboardStats().then(stats => {
// Process and display stats on the custom dashboard widget
document.getElementById('post-count').textContent = `Posts: ${stats.posts_count}`;
document.getElementById('comment-count').textContent = `Comments: ${stats.comments_count}`;
}).catch(console.error);
Fetching WordPress dashboard statistics using the REST API

Managing Posts and Pages

WordPress excels in content management by providing an intuitive experience for creating and organizing posts and pages. Whether you are a blogger, business owner, or content manager, understanding how to effectively manage posts and pages is crucial for maintaining a vibrant and accessible website.

Creating and Editing Posts

Posts in WordPress are dynamic content entries frequently used for blog articles, news updates, or time-sensitive information. The platform’s Gutenberg editor revolutionizes post creation with its block-based architecture, allowing users to add and rearrange paragraphs, images, videos, and other multimedia elements easily. Each block can be customized independently, ensuring content looks polished without needing coding skills.

Editing posts is just as straightforward; you can save drafts, preview how your post will appear live, and schedule posts to publish automatically at a later time. This scheduling feature is essential for maintaining a consistent content calendar and engaging your audience regularly.

For developers or power users, WordPress offers a powerful REST API. This enables creating, updating, or deleting posts programmatically. The following JavaScript example demonstrates how you can create a new post via the REST API, automating content publication if needed:

Understanding Pages

Unlike posts, pages are usually static and serve to present timeless information such as About Us, Contact, or Services pages. WordPress treats pages differently by not associating them with categories or tags, allowing them to stand alone in site hierarchy. This makes pages ideal for core website content that visitors will expect to find easily.

Managing pages in WordPress involves a user-friendly interface where you can create, edit, and organize pages using drag-and-drop menu builders. You also have the option to designate parent and child relationships, creating a nested page structure that helps with site navigation and SEO.

Media Management

Successful posts and pages are often enriched with media—images, videos, audio files, and documents. WordPress comes with an integrated Media Library that streamlines uploading, organizing, and inserting media into your content.

The Media Library supports bulk uploads and provides editing tools such as cropping, resizing, and rotating images. Additionally, media files can be categorized via plugins or inherent metadata, making it easier to manage vast media collections as your site grows.

Embedded media is also responsive, meaning it adjusts gracefully across devices, ensuring your site remains visually appealing and functional from desktops to smartphones.

Comparison with Other CMS Platforms

To appreciate WordPress’s strengths, consider its post and page management features alongside those of other popular CMS platforms like Joomla and Drupal:

WordPress stands out due to its simplicity and accessibility. The visual block editor paired with robust scheduling and media management functionalities offers an elegant solution that appeals both to beginners and seasoned professionals. While Joomla and Drupal provide powerful tools, they often involve steeper learning curves or require additional configuration.

Setting Up Your User Profile

Customizing your WordPress user profile is essential for presenting a professional online identity. Access your profile by clicking your username in the top-right corner of the Dashboard, then select “Edit Profile.” Here you can update your personal information such as your first and last name, nickname, and biographical details. These details help visitors connect with you on a more personal level.

WordPress integrates seamlessly with Gravatar, allowing you to associate a globally recognized avatar with your email address. Once you link your email to a Gravatar account at gravatar.com, your avatar will automatically appear across WordPress sites where you contribute, enhancing your brand consistency and recognition without having to upload your picture repeatedly.

Beyond basic profile data, you can also manage your contact information, set your preferred admin color scheme, and configure keyboard shortcuts for efficient content editing. Adding a strong, descriptive bio may help build trust with your audience, especially if your site features multiple contributors. Remember, your profile is part of your online identity, so take advantage of these options to make your presence memorable.

If you are comfortable working with code, WordPress offers hooks and functions to programmatically update user details and display the Gravatar in your profile view. This is particularly useful for developers or power users tailoring multisite environments or membership platforms to include enhanced user metadata and avatar representations.

Maintaining a professional, complete profile helps improve communication and fosters connections whether you’re blogging solo or collaborating within a larger community. Don’t overlook this key step—your WordPress profile is more than just an admin detail; it’s your face to the WordPress world.

Example PHP Code for Profile and Gravatar Integration

// Update WordPress User Profile
function update_user_profile( $user_id ) {
  if ( !current_user_can( 'edit_user', $user_id ) ) {
    return false;
  }
  update_user_meta( $user_id, 'first_name', $_POST['first_name'] );
  update_user_meta( $user_id, 'last_name', $_POST['last_name'] );
  update_user_meta( $user_id, 'description', $_POST['description'] );
}
add_action( 'personal_options_update', 'update_user_profile' );
add_action( 'edit_user_profile_update', 'update_user_profile' );

// Display Gravatar in User Profile
function display_gravatar_profile() {
  echo get_avatar( get_current_user_id(), 96 );
}
add_action( 'show_user_profile', 'display_gravatar_profile' );
add_action( 'edit_user_profile', 'display_gravatar_profile' );
  

Learning Resources for Mastering WordPress

Mastering WordPress requires access to quality learning resources tailored to various skill levels, from beginners to advanced users. Fortunately, the WordPress ecosystem is rich with tutorials, courses, and community support that make learning both accessible and comprehensive.

Online Tutorials

For self-paced learners, online tutorials are among the best ways to grasp WordPress fundamentals and advanced techniques. Websites like WordPress.org’s official support pages offer step-by-step guides covering everything from installation and setup to customizing themes and managing security.

Other popular tutorial platforms include WPBeginner, which is highly regarded for its clear and helpful articles on topics such as setting up pages, choosing plugins, and SEO optimization. SitePoint and Tuts+ also provide in-depth WordPress tutorials, often coupled with downloadable assets and example projects.

Video Courses

Video content is a preferred method for many learners who benefit from visual demonstrations. Platforms such as LinkedIn Learning, Udemy, and Coursera offer extensive WordPress courses taught by industry experts. These courses range from beginner-level introductions to advanced development and theme-building classes.

One standout is the WordPress 5 Essential Training course on LinkedIn Learning, which systematically covers the WordPress dashboard, content creation, theme customization, and plugin management. Udemy’s Complete WordPress Developer Course is another favorite, combining coding tutorials with CMS usage to help you extend WordPress capabilities.

Community Forums and Support

The WordPress community is one of the most valuable resources for ongoing learning and troubleshooting. The official WordPress Support Forums provide a vibrant space where users from all experience levels ask questions, share solutions, and discuss best practices. These forums are moderated by volunteers and include sub-forums for themes, plugins, and troubleshooting technical issues.

Beyond the official forums, communities such as the Advanced WordPress Facebook Group and the WPBeginner Community on Reddit offer real-time interaction and peer support. Attending WordCamps and local meetups also opens opportunities for in-person learning and networking with WordPress professionals and enthusiasts.

For developers looking to automate or integrate learning resources programmatically, the WordPress ecosystem offers APIs from which you can fetch up-to-date tutorials and documentation. Below is an example of JavaScript code to asynchronously retrieve the latest WordPress tutorials from an external API, illustrating how developers can harness these resources dynamically in their projects.


// Fetch latest WordPress tutorials from a custom API
async function fetchWordPressTutorials() {
  try {
    const response = await fetch('https://api.wordpress.org/tutorials/v1/latest');
    if (!response.ok) {
      throw new Error('Network response was not ok');
    }
    const tutorials = await response.json();
    console.log('Latest WordPress Tutorials:', tutorials);
    return tutorials;
  } catch (error) {
    console.error('Fetching WordPress tutorials failed:', error);
  }
}

fetchWordPressTutorials();


JavaScript example for fetching latest WordPress tutorials from an API

Combining these diverse learning methods—text tutorials, video courses, interaction in community forums, and hands-on coding—ensures a well-rounded approach to mastering WordPress. Whether you prefer studying independently, collaborating with others, or exploring code examples, there is a wealth of resources ready to support your WordPress journey.

Learn Visual Studio Code in 15 Minutes: 2026 Beginner Tutorial

Visual Studio Code (VS Code) has evolved into a cutting-edge AI-first development environment, revolutionizing how developers write and manage code. This tutorial helps you swiftly master VS Code’s powerful features, including Copilot Chat, inline suggestions, and Agent Mode, designed to enhance productivity and streamline your workflow. You will learn essential navigation techniques covering the activity bar, command palette, and integrated terminal, enabling efficient project management and debugging.

By the end, you’ll confidently create, run, and debug your first JavaScript application, exploring how AI-driven tools can assist in real-time coding and automation. Whether you’re a beginner or looking to update your skills for 2026, this concise guide equips you with practical knowledge to leverage VS Code effectively.

Follow along and transform your coding experience with “Learn Visual Studio Code in 15 minutes: 2026 Official Beginner Tutorial.”

💡

Did You Know?

Visual Studio Code is now an AI-first development environment featuring Copilot Chat and Agent Mode to accelerate coding tasks.

Source: Microsoft VS Code Official Release

Overview of Visual Studio Code

Visual Studio Code (VS Code) is a versatile and powerful code editor developed by Microsoft, designed to streamline software development across multiple languages and platforms. It has rapidly become one of the most popular editors due to its lightweight design, extensibility, and rich ecosystem of features. The 2026 iteration of VS Code emphasizes AI-first development, transforming the editor into a highly intelligent environment that goes beyond simple code editing.

At its core, VS Code offers an intuitive interface starting with the activity bar, which provides quick access to file exploration, search, source control, debugging, and extensions. The integrated terminal allows developers to execute commands without leaving the editor. One of the key differentiators is the Command Palette, accessible via Command + Shift + P, enabling rapid execution of commands and customization of keybindings. This interface design emphasizes both efficiency and flexibility, catering to beginners and experienced developers alike.

VS Code’s extension marketplace further enhances its capabilities, allowing users to tailor the editor for specific languages or tools. Git and GitHub integration is seamless, encouraging source control practices that are essential for modern software development workflows. Importantly, the 2026 version integrates advanced AI features including inline code suggestions, Copilot Chat, and what is known as Agent Mode, enabling automated assistance beyond typical autocomplete functions.

Key Features

  • AI-Powered Assistance: Inline suggestions provide real-time code completions and improvements, leveraging machine learning models trained on vast codebases.
  • Copilot Chat: Acts as an interactive assistant within the editor, capable of answering coding questions, generating code snippets, and automating file management tasks.
  • Agent Mode & Context Protocol: These establish a direct link between your AI assistant and practical tools, making it possible to start coding from scratch, debug, and publish projects effortlessly.

These AI integrations mark a shift in how developers interact with their code editors, positioning VS Code not just as a place to write code, but as an active partner in the development process.

The blend of traditional editor tools with groundbreaking AI makes VS Code an ideal choice for developers seeking to increase productivity and explore modern workflows. This tutorial, Learn Visual Studio Code in 15 minutes: 2026 Official Beginner Tutorial, guides new users through these features to unlock the full potential of the environment.


vsCodeOverview.js

JavaScript

// Example: Using VS Code’s AI-assisted features
function greetUser(name) {
// Inline suggestion from AI
return `Hello, ${name}! Welcome to Visual Studio Code.`;
}
// Running a command from the palette (pseudo-code)
const command = ‘git.commit’;
executeCommand(command);
// Example of utilizing Copilot Chat for code suggestions and debugging
// Chat prompt: “Suggest improvements for the greetUser function.”
// AI returns in-line improvements and integration tips.
console.log(greetUser(‘Developer’));

Illustration of AI-assisted coding in Visual Studio Code

Navigating the Interface

The Visual Studio Code (VS Code) interface is designed to provide quick access to all the tools you need, organized in a clean and efficient layout. On the far left, the vertical activity bar serves as your primary navigation hub. Each icon here opens a dedicated panel that focuses on a key aspect of your workflow.

The first icon on the activity bar opens the Explorer. This panel displays your project’s folder structure and files, allowing you to quickly browse, open, and manage them. It’s where you get a high-level view of your project and can handle files directly within the editor.

Next to Explorer is the Search tool, represented by a magnifying glass icon. This powerful feature lets you search across all your files in the workspace for specific text or code snippets. You can also perform replacements across multiple files, making refactoring and code cleanup very efficient.

Source Control comes next, symbolized by an icon that looks like a branch or a network graph. Clicking this opens the Git integration pane, which tracks changes you’ve made to your files over time. From here, you can stage changes, commit updates, and sync with remote repositories like GitHub. It’s important to be signed into your GitHub account to fully leverage these features alongside VS Code’s AI-assisted workflows.

The Run and Debug icon provides access to tools for executing your code and diagnosing issues. You can set breakpoints, inspect variables, and watch call stacks to understand and fix bugs effectively.

Further down, the Extensions Marketplace lets you browse and install additional features that customize and extend VS Code. Whether you want language packs, debuggers, or AI capabilities, this marketplace is your gateway.

At any time, you can access the Command Palette by pressing Command+Shift+P (on macOS) or Ctrl+Shift+P (on Windows/Linux). This is a powerful feature for searching and executing any VS Code command without needing to navigate through menus. It also lets you assign custom keybindings, personalizing your workflow.

Terminal Access

One of VS Code’s standout features is the integrated terminal. You don’t need to leave the editor or juggle separate windows for running command-line tools and scripts. Simply press Ctrl+` (backtick) on Windows/Linux or Cmd+` on macOS to toggle the terminal panel. This panel is fully functional, allowing you to run shell commands, scripts, and even view real-time logs right alongside your code.

The terminal supports multiple shells depending on your operating system, such as Bash, PowerShell, or Command Prompt. You can open multiple terminal instances and switch between them as you work, all within the VS Code window.

Summary of Navigation Shortcuts

For efficient navigation, key shortcuts in VS Code include those for opening the Explorer, Source Control, terminal, and the Command Palette. Mastering these shortcuts accelerates your workflow considerably.

// Open Explorer: View your project files and folders
Cmd+Shift+E  // macOS
Ctrl+Shift+E  // Windows/Linux

// Open Source Control: Track Git changes
Cmd+Shift+G  // macOS
Ctrl+Shift+G  // Windows/Linux

// Open Terminal: Integrated command line
Cmd+`  // macOS
Ctrl+`  // Windows/Linux

// Open Command Palette: Quickly access commands
Cmd+Shift+P  // macOS
Ctrl+Shift+P  // Windows/Linux

// Toggle Chat AI assistant (if enabled)
Cmd+Shift+C  // macOS
Ctrl+Shift+C  // Windows/Linux
Essential VS Code keyboard shortcuts for interface navigation

By familiarizing yourself with these interface components and shortcuts, you establish a streamlined foundation that makes coding in VS Code more productive and enjoyable. The integrated AI tools further augment this experience, making it easy to start coding, debugging, and managing source control all within a single, cohesive environment.

Utilizing AI Features

Visual Studio Code has evolved into a cutting-edge AI-first development environment, integrating powerful AI functionalities that significantly boost productivity and streamline coding workflows. Among the most impactful features are Agent Mode, Inline Suggestions, and Copilot Chat, each designed to assist developers through various stages of development without leaving the editor.

Agent Mode: Intelligent Task Automation

Agent Mode transforms VS Code into a proactive assistant capable of managing complex workflows. Instead of manually performing routine tasks, developers can invoke Agent Mode to automate file management, generate boilerplate code, or run diagnostics and tests—all powered by integrated AI. This mode leverages the Context Protocol (CP) to understand the project environment and provide appropriate action sequences, accelerating development cycles especially for beginners who may not yet be familiar with CLI or build pipelines.

For instance, a user could ask Agent Mode to “create a new React component with default props,” and VS Code would scaffold the required files and starter code instantly. This feature integrates seamlessly with source control, allowing file changes to be committed directly from the interface after generation or modification.

Inline Suggestions: Context-Aware Code Completion

Inline Suggestions bring AI-powered code completion directly into the editor viewport. Unlike traditional IntelliSense, these suggestions are generated by analyzing the current file’s content and the broader project context, thanks to the Copilot AI capabilities embedded in VS Code.

As you type, VS Code will propose whole lines or blocks of code tailored to your coding style and the task at hand. This feature minimizes keystrokes and can fill in complex logic or repetitive code patterns. It is especially effective in JavaScript and TypeScript projects, with deep integration for frameworks like React, Node.js, and Express.

Here is a practical JavaScript example demonstrating how AI inline suggestions from GitHub Copilot could be retrieved programmatically (via a simulated API) to assist code completion:

This snippet shows how a function might fetch inline suggestions based on the current code context, illustrating the backend workflow of AI assistance in VS Code. In reality, these suggestions appear seamlessly as you type without needing to call APIs manually, but understanding this helps grasp the underlying AI integration.

Copilot Chat: Interactive AI Assistance

Copilot Chat in VS Code acts as an interactive conversational interface with the AI assistant. Accessible via a side panel or a chat command, this feature lets you ask questions, request code snippets, debug advice, or even receive planning help for your project. Different modes like Ask Mode, Plan Mode, and Agent Mode tailor the assistant’s responses to your current focus.

For example, you could type “Explain how to use async/await in JavaScript,” and Copilot Chat will provide a concise explanation along with example code. Or you might ask it to review your current file and suggest improvements or potential bugs. This real-time contextual assistance reduces context-switching, keeping you productive within the editor itself.

Leveraging these AI features requires being signed into your GitHub account within VS Code, which enables access to the latest Copilot capabilities. The integration is smooth, with minimal configuration needed to start benefiting immediately. The AI enhancements open up new possibilities for both novice and experienced developers by lowering the barrier to entry and accelerating everyday tasks.

Creating Your First JavaScript File

Visual Studio Code makes it straightforward to create and manage JavaScript files. To start, open VS Code and navigate to the Explorer icon on the Activity Bar on the far left. Here, you can create a new file by clicking the “New File” icon or right-clicking inside your workspace folder and selecting “New File.” Name the file with a .js extension, for example, example.js. VS Code will automatically recognize the file type and enable JavaScript-specific features such as syntax highlighting and IntelliSense.

IntelliSense in Visual Studio Code is a powerful code-completion tool that provides you with context-aware suggestions. As you begin typing your JavaScript code, IntelliSense suggests possible completions, parameter info, and documentation for built-in objects and functions. This feature greatly accelerates coding speed and accuracy, especially for beginners learning syntax or API methods. For example, typing con will prompt IntelliSense to suggest console, enabling you to easily insert commonly used functions like console.log().

To demonstrate creating a simple JavaScript file, consider writing a small script that outputs a greeting with the current date and time. Define a function that creates a new Date object and logs a formatted string to the console. After writing the function, invoke it to see the output. Here is an example of such a script:

After you’ve saved your new JavaScript file, you can execute it directly within Visual Studio Code using the integrated terminal. Open the terminal by pressing Ctrl + ` (backtick) on Windows or Linux, or Cmd + ` on macOS. The terminal panel appears at the bottom of VS Code, where you can run Node.js commands if you have Node.js installed on your system.

Run your script by typing node example.js in the terminal and pressing Enter. The console output will display your greeting message along with the current date and time. This workflow of creating, editing, and running JavaScript files all within Visual Studio Code illustrates the seamless integration the editor provides for JavaScript development.

Additional Tips for Working with JavaScript in VS Code

  • Use Extensions: Though VS Code has built-in support for JavaScript, consider installing extensions like ESLint for linting code quality or Prettier for code formatting to enhance your workflow.
  • Explore Inline Suggestions: VS Code’s advanced AI-first features offer inline code suggestions powered by its Copilot integration, which can help auto-complete larger blocks of code effortlessly.
  • Leverage Snippets: Utilize built-in or custom snippets to quickly insert commonly used code blocks, speeding up development without repetitive typing.

This direct and beginner-friendly approach to creating JavaScript files in Visual Studio Code sets the foundation for building more complex applications, while the editor’s rich support ecosystem assists throughout your coding journey.

Debugging with Visual Studio Code

Visual Studio Code (VS Code) offers a powerful and user-friendly debugging experience that is especially suited for developers working with JavaScript and many other languages. Its debugging tools integrate seamlessly with your code editor, making it easy to identify and fix issues efficiently. Central to the debugging process are breakpoints, stepping controls, variable inspection, and the integrated output console.

Setting Breakpoints

Breakpoints are markers you set on specific lines of code where you want the debugger to pause execution. In VS Code, you can set a breakpoint simply by clicking in the gutter area to the left of the line numbers. This halts the program just before the marked line executes, allowing you to inspect current variable values, call stack, and program flow.

VS Code supports various types of breakpoints:

  • Line Breakpoints: Pause execution at a specific line.
  • Conditional Breakpoints: Pause only if a specified condition evaluates to true.
  • Function Breakpoints: Pause when a particular function is called.

These breakpoint types help tailor debugging to your specific needs for more focused problem-solving.

Viewing Outputs and Debug Console

Once a breakpoint is hit, the Debug Console panel becomes your view into the program’s state. Here, you can monitor console output, evaluate expressions on the fly, and interact dynamically with the running application. The integrated terminal also helps you inspect logs and run command-line utilities or scripts without leaving the editor.

VS Code also supports inline variable values while debugging, showing current values directly beside code lines. This inline debugging enhances the clarity and speed of understanding variable states at each execution step.

Practical Debugging Example

Consider this example where a simple factorial function is debugged. Setting a breakpoint inside the loop lets you watch how the result accumulates with each iteration:

In a more asynchronous scenario, debugging API call simulations with promise-based functions is straightforward. You can step through each awaited call and observe responses in real time.

Comparing VS Code Debugging Features with Other IDEs

Compared to other popular integrated development environments like JetBrains WebStorm, Microsoft Visual Studio, and Atom, VS Code stands out with its lightweight yet feature-rich debugging tools. It supports a broad range of breakpoint types, inline debugging, and a flexible integrated terminal. Additionally, VS Code benefits from active extensions—such as GitHub Copilot Chat—that add AI-powered assistance to detect issues and suggest fixes.

Overall, Visual Studio Code combines power and simplicity, lowering entry barriers for beginners and accelerating workflows for experienced developers.

Comparison with Other IDEs

Visual Studio Code (VS Code) has quickly risen to become one of the most popular integrated development environments due to its versatility, lightweight design, and rich feature set. When compared to other prominent IDEs like IntelliJ IDEA and Sublime Text, VS Code stands out for its balance of performance, usability, and extensibility, especially with the integration of AI tools that enhance productivity.

IntelliJ IDEA, primarily popular among Java developers, offers a very powerful debugging environment and advanced coding assistance, but it can be heavier on system resources. Its ultimate edition includes built-in AI assistance, though this comes at a cost, as the full version is paid. In contrast, VS Code is completely free and open source, with access to AI capabilities like Copilot Chat and inline code suggestions integrated directly into the editor, enabling a more accessible AI-first coding experience.

Sublime Text, on the other hand, is known for its snappy startup and minimal interface. It remains a favorite for those who prefer speed and simplicity. However, it requires a paid license and offers limited AI integration through external plugins rather than native support. Debugging features in Sublime are more basic compared to the comprehensive tools found in VS Code and IntelliJ.

From a performance standpoint, VS Code maintains a lightweight footprint despite offering a broad range of functionalities through its extensive extension marketplace. Its startup speed and efficient memory usage often outperform IntelliJ, which can feel more resource intensive. Sublime Text remains the fastest to open but sacrifices some advanced capabilities found in VS Code.

The following code snippet illustrates the intuitive nature of coding in VS Code, highlighting features such as syntax highlighting, IntelliSense for code suggestions, inline completion, and real-time error detection. This environment supports rapid learning and development, particularly beneficial for beginners stepping into software development.

Below is a comparison table that details key aspects such as pricing, AI integration, performance, extensibility, and debugging across Visual Studio Code, IntelliJ IDEA, and Sublime Text. This side-by-side view helps clarify the trade-offs and advantages of each tool, illustrating why VS Code has become the preferred choice for many developers.

User ratings and popularity further reflect VS Code’s strong standing in the developer community. With a user approval rating significantly higher than IntelliJ IDEA and Sublime Text, VS Code’s combination of free accessibility, extensibility, and AI-powered features provide a compelling all-around development experience.

Tips and Tricks for New Users

Visual Studio Code offers a multitude of shortcuts that can significantly speed up your development workflow. Key shortcuts include opening the Command Palette with Cmd+Shift+P (Mac) or Ctrl+Shift+P (Windows), toggling the integrated terminal using Ctrl+`, and quickly opening files via Cmd+P or Ctrl+P. Learning these will save valuable time navigating the interface.

Customization is a major strength of VS Code. Take advantage of user settings to tailor themes, font sizes, and keybindings to your liking. The Extension Marketplace allows you to add features like GitHub Copilot or Prettier for code formatting, enhancing your coding experience. Don’t forget, you can customize shortcuts via the Command Palette to fit your workflow.

New users often stumble on common pitfalls such as forgetting to sign into GitHub for source control features or neglecting to save files to see code suggestions actively. Also, misuse of extensions can sometimes slow down performance; install only those you need.

Mastering these basic tips will help you avoid frustration and set a solid foundation for efficient coding with VS Code.

Frequently Asked Questions

Visual Studio Code (VS Code) supports extensions, which are add-ons that extend its functionality beyond the default setup. Popular extensions include GitHub Copilot for AI code assistance and Live Server for real-time web page preview.

To install plugins, open the Extension Marketplace by clicking the Extensions icon in the activity bar on the left. You can browse or search for specific plugins, then click install. For some features and extensions, being signed into your GitHub account within VS Code is necessary to enable seamless operation.

VS Code is completely free to use. It is an open-source editor created by Microsoft, available on Windows, macOS, and Linux platforms. This free model allows beginners and professionals alike to leverage robust development tools without purchase or subscription requirements.

What are extensions in Visual Studio Code?

Extensions are add-ons that enhance Visual Studio Code’s functionality, providing features like language support, debuggers, and tools such as GitHub Copilot or Live Server.
How do I install plugins in VS Code?

You can install plugins via the Extension Marketplace by clicking the Extensions icon on the activity bar, searching for the plugin, and clicking install. Ensure you are signed into GitHub for some features.
Is Visual Studio Code free to use?

Yes, Visual Studio Code is a free, open-source editor developed by Microsoft, available for Windows, macOS, and Linux without any cost.

Conclusion

Visual Studio Code has evolved into an AI-powered development hub, transforming how developers build apps. This tutorial introduced core AI features like Copilot Chat and Agent Mode, alongside essential tools such as the command palette and integrated terminal. You learned how to create, edit, debug, and publish JavaScript projects seamlessly within VS Code.

Mastering GitHub integration empowers you to efficiently manage version control and collaborate confidently. The combination of advanced AI assistance and powerful built-in utilities positions VS Code as a versatile tool for all skill levels.

Embracing consistent practice will deepen your understanding and accelerate your coding journey. Explore further with “Learn Visual Studio Code in 15 minutes: 2026 Official Beginner Tutorial” to unlock more capabilities and improve your development workflow.

🎯 Key Takeaways from This Tutorial

  • Master the VS Code AI-first features including Copilot Chat and Agent Mode.
  • Use core tools like the command palette and integrated terminal efficiently.
  • Practice building and debugging JavaScript apps in VS Code.
  • Leverage GitHub integration for version control and publishing.
  • Continuous practice with these tools accelerates proficiency and productivity.

Every Claude Code Concept Explained for Normal People

Claude Code is revolutionizing how we interact with software by turning plain English commands into direct actions on your computer. Many find the blinking cursor on a black screen intimidating, struggling with terms like “context window” and “MCP servers.” But you don’t need to be a coding expert to harness its power. Through this series, you’ll learn how Claude Code automates tasks, builds websites, and performs complex operations without complicated syntax. Unlike passive chatbots, Claude Code acts—installing packages, creating files, and streamlining workflows. By mastering simple prompting techniques and understanding permissions, you’ll unlock the full potential of this powerful tool. This introductory guide, “Every Claude Code Concept Explained for Normal People,” breaks down 27 key ideas, each in under a minute. Whether you’re a non-technical founder or a curious developer, you’ll gain clarity and confidence to speed up your projects and automation effectively.

💡

Did You Know?

Claude Code goes beyond simple chatbots by actively performing tasks on your computer through plain English commands, making automation accessible to non-technical users.

Source: Anthropic’s Claude Code Overview

What is Claude Code?

Claude Code is a powerful, task-oriented AI assistant designed to go beyond just chatting. Unlike traditional chatbots like ChatGPT, Claude, or Gemini that primarily respond to user messages, Claude Code actively performs meaningful actions on your computer. It can create files, build websites, install software packages, and automate repetitive tasks—all through natural, plain English commands.

What sets Claude Code apart is its ability to translate simple spoken or written instructions into concrete computer operations. For example, instead of typing complex code snippets, a user can simply ask Claude Code to “install a package” or “build a website” and watch as those tasks get executed seamlessly. This lowers the barrier to entry for those who aren’t full-time developers or coders, enabling non-technical users to automate parts of their workflows efficiently.

Imagine telling Claude Code to generate a starter JavaScript file, run an npm installation, and create a basic website with predefined pages—all in one conversation. Its integration with your local environment lets it take direct actions, which traditional conversational chatbots can’t do. This makes Claude Code ideal for developers looking to speed up project setup as well as entrepreneurs or hobbyists who want to build digital projects without deep technical skills.

How Claude Code Compares to Other Chatbots

While conversational AI tools like ChatGPT excel at generating text, explaining concepts, or brainstorming ideas, they do not interface directly with your computer’s operating system or file systems. Claude Code fills that gap by being task-centric and action-capable. It acts like a virtual developer assistant embedded in your own environment, capable of both understanding commands and executing them in real time.

Other general-purpose AI chatbots often require you to copy and paste their output into your coding environment manually. Claude Code eliminates that friction by bridging communication and execution, making the development process more fluid and intuitive. It requests permissions before executing significant actions, ensuring you remain in control of your digital workspace while gaining productivity.

Practical Examples of Claude Code in Use

Some everyday scenarios where Claude Code shines include automating the creation of new projects, running installation scripts, editing or generating configuration files, and compiling simple websites or applications. For instance, you might tell Claude Code:

  • “Create a new JavaScript file that logs ‘Hello, Claude Code!’”

  • “Install the Express package using npm”

  • “Build a website with Home, About, and Contact pages”

Claude Code handles these multi-step tasks as if you had typed each command yourself, but in a fraction of the time and without needing to learn intricate coding details.

By enabling you to automate technical setups with straightforward English commands, Claude Code empowers users to focus on creativity and problem solving rather than syntax. This simplicity is a core reason why many turn to it as their AI partner for coding and development.

Every Claude Code concept, from its task execution model to its permission system, is designed to make tech more accessible and less intimidating—hence the phrase “Every Claude Code Concept Explained for Normal People.” This inclusive approach encourages users of all backgrounds to leverage the power of AI-assisted automation.


claudeCodeExample.js

JavaScript

// Example usage of Claude Code to automate tasks
async function automateTasks() {
// Create a new file
await claudeCode.createFile(‘helloWorld.js’, ‘console.log(“Hello, Claude Code!”);’);
// Run a package installation
await claudeCode.runCommand(‘npm install express’);
// Build a simple website
await claudeCode.buildWebsite({
title: ‘My First Claude Code Site’,
pages: [‘Home’, ‘About’, ‘Contact’]
});
console.log(‘Tasks automated successfully with Claude Code!’);
}
automateTasks();
Automating tasks with Claude Code

Understanding Key Concepts of Claude Code

Claude Code is a distinctive automation tool that operates differently from traditional chatbots like ChatGPT or Gemini. Its primary power lies in performing real tasks on your computer—whether creating files, building projects, or running commands—just from plain English instructions. Grasping its core concepts makes it easier to harness its full potential without being overwhelmed by technical jargon.

The Context Window: Your Workbench for Conversation and Commands

At the heart of Claude Code’s functionality is the context window. Think of it as the workspace where Claude keeps track of everything relevant to your current task. This window holds your entire conversation history and all instructions related to the project you’re working on, which allows Claude Code to understand context, remember past commands, and build on previous actions efficiently.

This means you don’t have to repeat yourself or re-explain details each time. By having a memory of what’s been discussed and done, Claude Code adapts its responses and execution without losing track of your goals, reducing errors and improving speed.

Sub Agents: Delegating Work Within Claude Code

Another key architecture feature is the use of sub agents. Imagine these as specialized helpers within Claude Code, each responsible for certain subtasks or components of your project. When you give a complex command, Claude Code can break it down and assign pieces to these sub agents to focus on simultaneously.

For instance, one sub agent might handle backend code generation while another manages frontend elements or file organization. This division of labor not only accelerates project completion but also keeps the workflow organized, making debugging and iteration much easier.

MCP Servers: The Backbone of Claude Code Execution

To power its task execution, Claude Code interfaces with what are called MCP servers. These servers act as the backbone infrastructure that processes commands securely and efficiently. MCP, which stands for Multi-Component Processing, coordinates the distributed work of sub agents and interfaces between your computer and Claude’s cloud capabilities.

The MCP servers ensure reliability and scalability, so whether you’re automating a small script or a complex multi-layered app, Claude Code processes every step methodically and securely. They also manage permissions and safety protocols to prevent unintended actions on your system.

Breaking It Down: Simple Automation with Clear Commands

With these components working in harmony, Claude Code allows developers and non-developers alike to execute sophisticated tasks using straightforward natural language prompts. For example, you can simply ask Claude Code to install a package, create project folders, or write initial code files—all without typing traditional commands or scripts.

Below is a snippet that demonstrates a typical Claude Code sequence where a user commands Claude to set up a project environment with installed libraries and initial files:


claudeCodeExample.js

JavaScript

// Example Claude Code command to install a package and create a project folder
runCommand(‘install package lodash’);
createFolder(‘MyProject’);
writeFile(‘MyProject/index.js’, `import _ from ‘lodash’;
console.log(_.VERSION);`);
// Explanation: Simple commands to automate setup tasks without complex syntax
A Simple Claude Code Script Automating Setup Tasks

This example highlights how Claude Code abstracts away detailed programming syntax, allowing users to focus on the intent rather than the technical complexity. When you tell Claude Code to “install package lodash,” it translates that straightforward request into actual terminal commands and waits for your confirmation before proceeding.

Why These Concepts Matter

Understanding the context window, sub agents, and MCP servers clarifies how Claude Code manages complex automation securely and effectively. These building blocks ensure that tasks are compartmentalized, contextualized, and processed with precision, making it an ideal tool for both beginners and seasoned developers looking to accelerate their workflow.

Mastering this foundational knowledge not only helps you craft better prompts but also empowers you to troubleshoot issues, optimize workflows, and fully leverage Claude Code’s automation capabilities in your projects.

How Claude Code Streamlines Development

Claude Code revolutionizes the development process by transforming complex technical tasks into straightforward commands anyone can understand. Unlike traditional development tools that require extensive coding knowledge, Claude Code executes tasks through conversational English instructions. This unique approach drastically reduces the friction often experienced by non-technical founders and developers alike.

One of the most significant benefits of Claude Code is its ability to save time on routine tasks. Consider actions like installing packages, managing files, or generating boilerplate code—tasks that traditionally require switching between command lines and documentation. Claude Code simplifies these steps into single prompts. For example, instructing Claude Code to “install the lodash package” triggers an automated installation workflow without typing out lengthy commands. This intuitive interaction not only speeds up development but also minimizes human error.

Real-world usage highlights Claude Code’s value. Developers frequently report faster setup times for projects and quicker iterations on testing, thanks to its automation capabilities. By automating file management, Claude Code eliminates tedious manual copying or organization, allowing developers to focus on creativity and problem-solving. Moreover, its ability to instantly generate website components from natural language descriptions accelerates frontend development considerably.

Here is a practical example illustrating Claude Code in action. This JavaScript snippet demonstrates how a simple command can be sent to Claude Code to handle package installation asynchronously. The response confirms success or failure, streamlining workflows with minimal developer input:


claudeCodeExample.js

JavaScript

async function useClaudeCode() {
// Request Claude Code to install a package
const command = ‘install lodash package’;
const response = await ClaudeCode.run(command);
console.log(‘Claude Code response:’, response);
if(response.success) {
console.log(‘Package installed successfully!’);
} else {
console.error(‘Failed to install package.’);
}
}
useClaudeCode();
Using Claude Code to perform a package installation command

Beyond simple commands, Claude Code supports a broad array of developer functions. It automates testing by running suites on command, freeing developers from manual test execution. It also manages project files intelligently, moving or renaming them without error. This level of automation reduces cognitive load, helping teams maintain focus on high-value tasks.

In the context of web development, Claude Code’s ability to build components based on plain descriptions facilitates rapid prototyping. Developers can quickly iterate UI elements by verbally specifying layouts and styles, which Claude Code translates into functional code. This eliminates the usual back-and-forth between designers and engineers, compressing development cycles significantly.

For instance, developers using Claude Code have reported up to 85% time saved when installing packages and 75% time saved on file management tasks. Building website components through Claude Code commands yields a 70% acceleration compared to traditional coding methods. Testing and boilerplate code generation also see impressive time reductions, around 65% and 60% respectively. These numbers demonstrate Claude Code’s capacity to optimize core development activities, making it an indispensable tool.

Time Saved Using Claude Code Across Common Development Tasks

Ultimately, Claude Code empowers both novices and experienced developers by removing technical barriers. Its natural language processing combined with task automation promotes a seamless development experience. By relying less on memorized commands and more on intuitive interaction, teams can avoid frustration and speed projects toward completion.

Additionally, Claude Code’s permission system ensures safety when executing critical actions. This feature creates a trustworthy workflow where users maintain control, approving sensitive operations while delegating routine ones for swift execution.

As adoption grows, Claude Code continues to evolve with enhanced capabilities tailored to streamline workflows further. Whether you are a product founder without coding skills or a seasoned developer seeking efficiency, Claude Code offers a compelling way to accelerate software creation with less overhead and more clarity.

Permissions Management in Claude Code

Permissions management is a critical part of Claude Code’s functionality, designed to keep you in control while it performs powerful actions on your computer. Since Claude Code can create, modify, and delete files or install software directly, it always respects user consent before executing sensitive operations.

At its core, Claude Code checks whether you have granted permission for a specific action before proceeding. For example, simple actions like creating a file or installing a package might have pre-approved permissions allowing the assistant to run them without interruption.

However, more sensitive actions, such as deleting a file, require explicit approval every time. Claude Code asks for permission via a prompt when it encounters such tasks, ensuring you stay fully aware and can prevent accidental or unwanted changes.

This approach balances security and convenience. Initially, when you’re just starting, Claude Code will request permission before most significant actions to let you understand what is happening. Once you feel comfortable, you can pre-approve certain safe actions to streamline your workflow while still maintaining strict approval checks for anything risky.

How Permission Requests Work

Before executing an action, Claude Code runs a permissions check using an internal list of allowed and disallowed operations. If the permission isn’t already granted, it pauses to ask you directly. You can then grant or deny the request, influencing whether the operation proceeds.

This mechanism ensures that Claude Code never takes action that might compromise your data or system without your knowledge and consent. It acts not only as a task executor but also as a responsible agent respecting your control over the environment.

Examples of Permissions in Action

  • Create File: Frequently approved as a safe operation for generating new scripts or documents. Claude Code usually proceeds immediately.

  • Install Package: Often pre-approved if you have configured Claude Code to trust these actions to install dependencies or software components automatically.

  • Delete File: Treated as highly sensitive and blocked by default until you grant explicit permission. This avoids accidental data loss.

Claude Code’s permission system actually simulates real-world scenarios where each action is reviewed against your preferences or immediate responses. This is how it safely automates complex workflows without risking your data integrity.

Below is a code example illustrating this permission request and execution flow, showing how Claude Code asks for approval before performing actions and handles them accordingly:

Best Practices for Prompting Claude Code

Effective prompting is the secret to unlocking Claude Code’s full power. Rather than vague commands like “Make a website,” provide detailed instructions such as, “Create a responsive personal portfolio website with a navigation bar, about me section, and contact form using HTML, CSS, and JavaScript.” This clarity helps Claude Code understand your exact needs and deliver precise results.

One common mistake is trying to overload a single prompt with too many demands or being overly broad. For example, saying “Automate stuff” is too ambiguous. Instead, specify the task like “Automate daily backup of my documents folder to Google Drive at 8 PM using a bash script.” This approach reduces confusion and speeds up the process.

Another key tip is to mention any specific technologies, frameworks, or languages you want Claude Code to use. This ensures compatibility with your existing environment and prevents unnecessary rework.

Keep prompts straightforward and actionable. Avoid combining unrelated commands in a single prompt. Break down complex workflows into smaller, manageable steps. By doing so, you allow Claude Code to work efficiently and minimize errors.

Remember that Claude Code values precision: the better your prompt, the smoother your automation experience. Always review and refine your instructions based on the outputs you receive, gradually mastering how to communicate with Claude Code like a pro.


promptingClaudeCodeExamples.js

JavaScript

// BAD Prompt
“Make a website.”
// GOOD Prompt
“Create a responsive personal portfolio website with a navigation bar, about me section, and contact form using HTML, CSS, and JavaScript.”
// COMMON MISTAKES TO AVOID
// 1. Being too vague
// 2. Overloading commands
// 3. Not specifying required technologies
// Example improvement
// Instead of: “Automate stuff”
// Use: “Automate daily backup of my documents folder to Google Drive at 8 PM using a bash script.”

Good vs Bad prompts for Claude Code